
Watering.
In their natural habitat succulents can go for months at a time without rainfall and are well adapted to such conditions. In cultivation however, we can do better to help them to achieve their full potential by tending to their watering and feeding needs. It must be stressed that over watering can be more harmful and if in doubt withhold watering.
The type of container used will also determine the amount of water needed, larger pots tend to retain moisture longer than small pots. Clay pots will loose more moisture than plastic or glazed containers so there is no set rule to govern watering. Most growers allow soil to dry out between watering. There is a tendency for inexperienced growers to give a little water often through fear of over watering. This style of watering tends to only water the top half of the soil, encouraging the roots to stay on the soil surface rather than going down in search of fresh food and moisture.
Some plants whose natural habitat is on mineral based soil may be intolerant of alkaline soil. In hard water areas the gradual build up disolved solids in the soil could be detremental to plant health in cases where the plant remains in the same pot for a number of years. The alternative is to use clean rain water by harvesting rain water using a rain barrel or water butt after suitable treatment to remove algae and other biological contamination by filtration. The unsightly build up of dry residues on the outside of clay pots is also minimised when using rain water.
Refrain from watering during the winter when the plants are dormant. I usually move large pots under cover by the end of September and start watering again about mid March, a little at first, then gradually more over the coming weeks. The precise time that the growing season begins will depend on where you live. During the growing season, agaves can be watered the same as any other pot plant providing you have good drainage. It doesn't hurt to leave them out in a rain shower to give the leaves a good wash and to flush out any build up of salts from the pot.
Rain Water Harvesting.
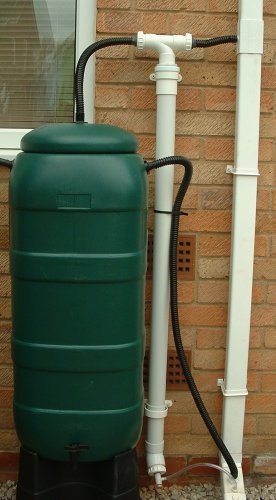 |
Rain Barrel with first flush filter. |
Rain Barrel.
Rainwater harvesting is the collection,
storage and distribution of rainwater from the roof for subsequent use.
The rain barrel or
garden water butt is the simplest way of collecting and storing rainwater above ground. It does
not have to supply water when temperatures are below freezing. From about October to March
the rain barrel can be emptied and the output from the diverter can be plugged to prevent
it refilling.
Rain barrels are commerically available or they can be made from
large plastic containers discarded by the food industry, though the colours available may not
be to every ones taste!
A rain diverter is a device that is fitted to the gutter down pipe at the correct height and allows the rain water to flow out of the down pipe when the water level in it's outlet pipe is lower than that in the body of the diverter. There are two ways that you can fit a diverter depending on the fittings available on your water butt.
Single inlet pipe.
This is the simplest system to set up and relies on the desired maximum water level in the barrel being level with the mark on the diverter body. Installation is simply a matter of removing a small section from the down pipe at the correct height and inserting the diverter. The height of the barrel compared to the diverter is critical, if the barrel is too low it will overflow. When the barrel is full and at the correct height, excess water should continue to run down the gutter down pipe to waste. The disadvantage with this kind of setup is that if you have rain and a full barrel, the fresh water runs down the drain and the stagnant water remains in the barrel. Secondly there is no head of water between the diverter and the barrel to allow the use of any kind of inline filter.
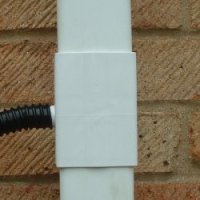 |
Rain diverter. |
Inlet and Overflow pipe.
This setup allows fresh rain to flush out stagnant water but does require some extra tubing to
connect up the overflow back to the down pipe. The diverter can also be placed higher than the fill level on the
barrel which allows the use of an inline filter if required.
With both of the above arrangements, the most
important consideration is that the barrel does not overflow when it is located next to the wall of a house.
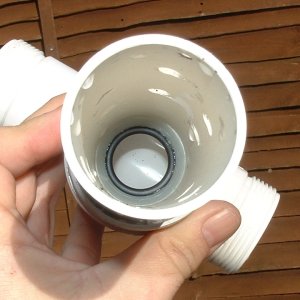
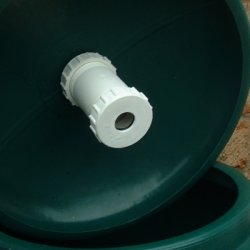
Inlet Filter.
Because of the design of the rain diverter, only small debris, about 8 mm or less, will enter the
first flush filter and continue to the barrel. To prevent this material entering the barrel, an inlet filter
can be placed out of sight in the barrel lid whereby it can easily be removed for subsequent cleaning.
The barrel inlet filter is made from 40 mm solvent weld plastic waste fittings and contains a 250
micron mesh filter. The filter housing can be unscrewed and the filter removed for cleaning.
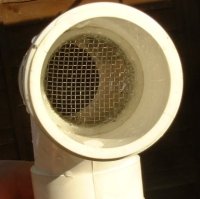
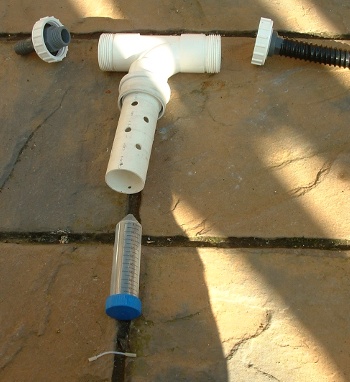
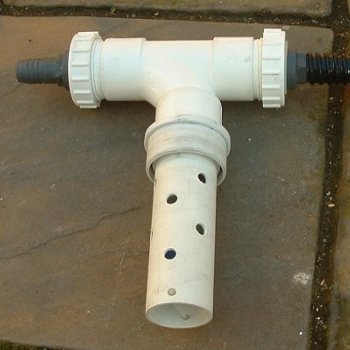
First Flush Filter.
The first flush of water from the roof can contain unwanted debris and airborne contaminants. To prevent these contaminants entering the barrel the first slug of contaminated rain water is diverted into a chamber where it slowly drains to waste. When there is sufficient rain the chamber will fill, the float then rises and seals off the chamber preventing the contaminants entering the barrel. The clean rain water then flows into the barrel. At the bottom of the chamber there is a drip valve which allows the chamber empty at slow rate once the rain ceases. The float then falls and the chamber is reset ready for the next rainfall. This action prevents the contaminated water passing to barrel.
First Flush Chamber Construction.
The filter shown with the barrel was constructed using 50 mm solvent weld plastic
waste fittings and holds about 2 litres. If a bigger retention volume is required then the chamber could
be constructed as a 'U' shape or by using a larger diameter pipe. A coarse filter screen was placed on the
outlet so that coarse debris would be retained in the chamber.
To ensure a reliable seal for the float valve
a piece of plastic was machined to hold an O ring. The current
float is a disposable plastic container with a cone shaped bottom. A small plastic ball of the right size might also
work.
The filter head is constructed using 40 mm solvent weld fittings and a 50 to 40 mm reducer. At
the top of the main chamber is a 50 mm expansion coupling into which the filter head is a push fit. This allows
easy dissasembly for cleaning. The bottom of the chamber can also be unscrewed to remove debris and access the gauze
that prevents the drip valve from being clogged up.
 |
 |
O' ring Float Seat. |
Filter Screen. |
 |
|
Head Components. |
Barrel Inlet Filter. |
|
Head Unit Complete. |
On the next page we take a look at temperature.


